
GLM ASSOCIATE
Member Dashboard
Members Main Dashboard – A quick look at your Member information
- Displays any Pending member profiles updates that need to be approved
- Number of current Members
Members List – a complete list of all members including archived members
Search members by Categories, Pending status, or text search
Settings – Update existing information or create a new categories for your Members

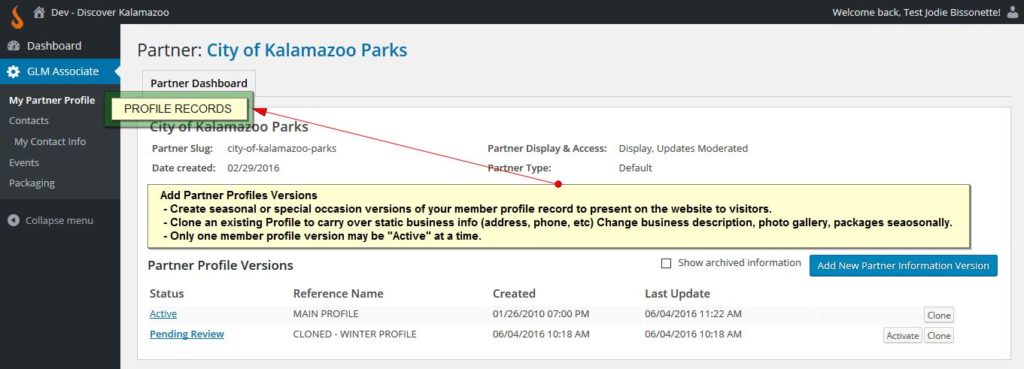
Member Profile Versions
- Multiple member profiles can be created for one Member.
- Active – View Member profiles (Active, Pending Review, Inactive, Archived)
*Only one member information version may be “Active” at one time. If another is made active, then the one that was active is changed to inactive. This is a great way to market your business record listing seasonally or during a special event period for your destination. - A Member Profile Version may be “cloned” to permit updating one that’s currently active. When a version is “cloned”, all of the information is copied to the clone, including images. This permits the user to do things like change images or delete them in the cloned version without disrupting the live (active) version.
Edit Profile Record
Profile Data
⦁ Address & Location – The map will display your location after the address is entered. You can ‘drag and drop’ the location bubble to the exact location is the mapping system does not quite have your lat/lon correct. Alternatively, you can manually add the lat/lon data of your business location in lat/lon fields that are present under the map image.
⦁ Description – Edit your Profile profile. Remember to paste content/text as Plain Text from any outside resource (Word Document, website, etc,)
⦁ Short Description – Used as your description in the member listing display. Limited to 120 characters, so make sure your message is succinct!
⦁ Contact Info for Website– List Phone numbers, Email address and Website Address that will be listed with your business listing and profile page.

Categories & Amenities
⦁ View the categories your profile record is listed under. Update the amenities list for what is applicable to your business record.
Images & Media
⦁ Easily add images to create a photo gallery to display with your profile.
⦁ Add a Video from YouTube or Vimeo with link
⦁ Show your live feed or web cam
Images – Best Practices
⦁ Best image sizes: Profile 300 x 200, Image Gallery 800 x 600 or an image between 800 and 1000 pixels wide. Images should be stored as a JPG or JPEG file.
⦁ Supply images that have a reasonable “aspect ratio 3×2”, and make sure the images are horizontal, not vertical and a file size of 100 to 250 KB. Images will be automatically resized for use in the Website. PLEASE NOTE: Images that are too large will be rejected,
⦁ vertical images will be cropped to fit horizontal aspect ration.
⦁ Select ‘Featured Image’ – Your main profile page will display a ‘featured image’ that is selected from your photo gallery at the top of your content area on profile page. Switch up your Featured Image every once in a while to give your visitors a fresh view of your business!
Drag and Drop Photo Gallery
⦁ Open computer folder that contains your resized 800 x 600 (best aspect ratio 3×2). Hold Ctrl key and select all photos for gallery
⦁ Drag highlighted/selected photos into Image Gallery drag and drop box
⦁ Once all images are uploaded, you can add title, description, and reorder by grabbing image field and ‘dragging’ into position.
⦁ Select ‘Featured Photo’ to display at the top of the content area of your profile page
⦁ Mouseover any image to view in ‘full size’

Files
⦁ Upload a PDF file.
⦁ Give the file a name that will appear as the link on the front-end of the website.
Member Contacts – Create and manage users
- Add New Member Contact – Multiple users can be created with different permissions.
- Contact Type – A contact can be set up as a, Role like Front Desk or as an individual – Personal contact.
- Permissions – Entity Manager, Log-in Contact, Restricted Contact.
- Entity Manager > Rights to modify all information with contacts entity (member profiles, location, events, packages, etc.)
- Log-in Contact > Can log into members only area to review information, but not permitted to make any updates
- Restricted Contact > No login privileges. Used only for personal contact information.
- Display/Moderate/Archive
- Display, Updates Moderated – When an account is updated the member information status is Pending. The Member Administrator must approve all pending information before it is updated on the website.
- Display, Updates Not Moderated – the member account information is updated automatically and displayed on the website.
- Display, No Access – the member is not able to view or edit their information. The information can only be accessed and updated by a higher-level user. The member information is still displayed on the front-end of the Website.
- Not Displayed, No Access – the member is not able to view or edit their information. The information can only be accessed and updated by a higher-level user. The member information is still displayed on the front- end of the Web site.
- Email Address – Required and cannot be change once created with the contact record.
- Login Username – Unique to user. Username cannot be change once created.
- Login Password – Must be at least 8 characters and include at least one number, one letter, and at least one special character. (# . – _ , $ % & !) A password can be recovered by email at the login page.
Events
Manage your event records seamlessly by incorporating an image, description, location, website or social media account that is relevant to your event. The Events calendar includes ‘add to calendar and social sharing features’ for our visitors, as well as a printable PDF of event queries the visitors can create on their own. Existing events are displayed in your Event List, giving you an opportunity to edit, delete, etc. All new events that are added are pending Website Administrator Approval.
Event Records can include:
- Complete Event details – include Category, Event web address, Event cost or Ticketing information
- Location – Add a Location or use your existing business record location
- Dates – Set the date and time
- Recurring Event – *Remember to enter the date and time of the first instance of the repeating event. Set Monthly, Weekly, Days of the week, or select specific dates in a month with Days of the Month. TIP: Week of the Month must always be selected even if the event is not on a specific day of the week then Week of the Month should be set to ALL.
- Create a custom Schedule: Select with Calendar > Click any dates over the range of days, weeks or months that the event should appear for visitors.
- Summary Calendar – view events in a calendar
- Administrative Contact – contact info of the person adding and managing the event
- Attach Files – Add up to three files for the event

Leads
Search by date range and areas of interest, downloading your visitor leads that have given permission to your organization to share their contact information with your members. Administrators of the website have full access to all visitor contacts, with additional groups and search criteria available for their custom profiling of visitors.
Packages
Multiple packages can be created and can displayed. Set each package with their Start and End date – This is when you would like the package to appear on the website, and when it should automatically be removed from public display. Expiration date displays with package to let visitor know when this special offer ends!
- Title – Name of packages
- Short Description – This is used as your description in the member listing display.
- Description – Write the full details of the package. Remember to paste content/text as Plain Text from any outside resource (Word Document, website, etc,)
- Image – Download an image or logo for the package
- Start Date – Schedule when your package will display on the website
- End Date – Set the date for when the package will be removed from displaying on the website.
- Expire Date – Set the date for when the package expires. This date displays with the package record.
- Price Description – The price can be any text form i.e. 10% off, Buy One Get One.


Amenities & Groups
-
Amenities can be created for any type of business listing. Amenities can be created by clicking the Add an Amenity button. This list is available in the Member Profiles.
-
Adding Amenities to the Filter search with Groups – All Amenities must be related to a Group in order to be searched in the Filter box on the front-end of the website. The most common Groups are lodging or restaurants.